12.
Creating Your Own Data
12. Creating Your Own Data
We have learned what we
can do with the geographic data. We make a thematic map, find the answer to the
question associated with the geographic location, made a chart, and made a
poster that puts together various documents. GIS provides insight on how to
deal with problems, as well as how to interpret the phenomenon by organizing
themes in a new way (i.e. in a spatially integrated way).
One of the most
important components in doing GIS would be have an appropriate data set suited
for your need. How do we get the data? In the module1, you have been introduced
to some publicly available data set like TIGER, National Atlas, and many more.
There are also private data vendors (e.g., GDT, NavTech, ArcData, Caliper, and
so on) you might want to consider to further your analysis or research.
It is pretty likely that
your research will be deterred from not getting an appropriate data set. This
module is designed to help you create your own data in case you may have to.
Creating spatial data does not necessarily mean you have to create them from
scratch like digitizing the paper map and converting the spagetti code (called
this way due to the lack of topology) into vector format. Even if you may not
have noticed, we already made some data set – joining attributes to spatial
boundary in the module 8, for example. There is millions of possibility that
lets you create your own data – simply you can add a value by analyzing the
relationship between variables (you can calculate them into the field value in
a table).
This module is rather
focused on geocoding. Geocoding can be roughly defined as
the process of converting the daily-life location to real-world location on the
earth. For example, the location of your place may be expressed as the street
address, like 123 University Ave. This address actually has the real world coordinates
such as latitude and longitude even though we don’t refer to your place with
this information unless you are the pilot.
|
Expression
of a Location |
|
Real
world coordinates (Lat/Long) |
|
1692
Sheridan Dr, Buffalo, NY |
|
W
78.87106/ N 42.98086 |
|
Erie
County Medical Center |
|
W
78.82904/ N 42.92716 |
What is good about
geocoding? Without geocoding, you wouldn’t be able to position the address on
the map. In other words, geocoding lets you create spatial data from the
attributes about the location.
Address Geocoding
We will look at how to
geocode address data first. Suppose you have a table that contains the address.
You are asked to make a map showing their location expressed as the address in
a table. How can we do? (geocoding) What do we need? (reference theme &
address table) First of all, we need a reference data as well as the address
table. Since the address is expressed based on the street, we need to have a
street data against which the addresses are matched. We will call this reference
data the Reference Theme, and a table containing addresses the Address
Table. Fortunately, there is free data set (it may be the case only in the
U.S; Other countries technically sell this kind of data) such as TIGER/Line.
TIGER/Line includes a street network as well as boundaries. You can download
the data in shapefiles! from ESRI website with no charge. Now we have a data.
Since the address table contains the stores in Erie County, it should be fine
to use street networks for Erie County only.
Add the street network
theme in a view. Make this theme active, and then choose the Theme Properties
menu. Highlight the icon [Geocoding] in the left.
The Theme Properties
dialog box lets you establish the appropriate address style fit for the data
set you are using. You may have to select the right field for each item. Just
click OK because it will be automatically set in the case of TIGER. The Build
Geocoding Index message box will pop up; Press Yes button. This procedure is
necessary to make a theme matchable. If there is no index built already,
ArcView will display a message box prompting you to confirm building the
geocoding indexes. Press Yes button to build the index. This makes the
geocoding process faster.
Now let’s add an address
table. Add a table in a project window by clicking Add button when the Tables
icon highlights.
The table contains four
fields: Id, Address, Zip, and Name. We will use Address and Zip field for
geocoding. In a view, choose the Geocode Addresses… in the View menu. This menu
item is enabled only when the street network is made matchable. ArcView will
display the Geocode Addresses dialog box.
The Geocode Addresses
dialog box lets you specify the right field for each item. Reference Theme is
set to the data you just made matchable in the Theme Properties dialog box.
Select the file stores.dbf for the Address Table, select [Address] for the
Address field, and [Zip] for the zone field. Specify the output file name and
location in the Geocoded Theme list. Click the Geocoding Preferences button to find
out what it is.
The Geocoding process
uses certain criteria such as how similar the spellings of source strings (in a
address table) are to those of target strings (in a reference theme). The
Spelling Sensitivity tells you to which degree you would weight the correct
spelling. When you lower this score, misspelled strings will not be penalized
as much as it used to be. So you can change this score carefully depending on
the quality of an address table. In addition, this dialog box allows you to set
the threshold used to tell whether or not to be treated as a match/unmatch and
candidate/no candidate. Just click OK. When you get back to the Geocode
Addresses dialog box, click the Batch Match button. The Batch Match tries to match
all records at once if they can.
When the Re-match
Addresses dialog box pops up, you can choose to Batch Re-match after changing
the Geocoding Preference, or Interactive Re-match, or Stop here. Since there
are only 4 unmatched cases, we will go over four records one by one by choosing
the Interactive Re-match.
The Geocoding Editor
dialog box allows you to manually select one out of candidates shown in the
bottom. Unfortunately, we don’t even have candidate to choose from. What can we
do about it? It may be that the standardization doesn’t work for this source
string. ArcView uses Standardization to make it easier to match. What it does
is to parse (or divide) the address component into several subcomponents.
Standardization Click the Edit Standardize… button.
The Edit Standardization
dialog box tells you how the source string is parsed. “South Park” is separated
into “South” for the StreetName1 and “Park” for the Type1. But actually when
the address is expressed as an intersection, the street type is usually
omitted. Type “South Park” for the StreetName1 while the Type1 is left blank.
Click OK button. Then
ArcView automatically finds the candidate based on the new standardization, and
displays them in the Geocoding Editor dialog box. Choose the appropriate
candidate, and click Match button if nothing’s wrong.
Modify the preferences
if necessary. Just continue to the next case since the modifying the
Preferences doesn’t seem to work. If you lower the score in the Preferences
dialog box, you may have more likelihood of finding a match at the expense of
the matching accuracy. There are many reasons why some records are not matched –
the address information given may be wrong (e.g., confusing street type (Niagara
st? Niagara rd?), wrong zip code), the address is not matchable against the
reference theme in case the reference theme is not complete, the address uses
some alias (e.g. hospital name, building name), the standardization may be
wrong, and so on. You may want to modify the record itself in a table, use an
alternative reference theme, use alias table (e.g., University Plaza turns out
to be 3500 Main St), most easily modify the Preferences. Click OK button to
finish geocoding in the Re-match Addresses dialog box. The geocoded theme will
be displayed in a view. Let’s look at the theme table.
The new fields will be
generated as a result of geocoding. [Av_Status] tells you whether the address
is matched or not. (M indicates a match while U indicates no match.) [Av_Score]
is assigned to each record. Unmatched records do not have any coordinates
compared to the matched records even though they are shown in a table.
Extra…. If you want, you
can create a marker from the image file. Open Pallette Manager from the Legend
Editor. Choose Marker for the Type list. Click the Import in the bottom. Choose
the image file you wish to use as a marker. Go to the Marker Pallet. The image
file is imported into a marker. Choose the marker. Click Apply button.
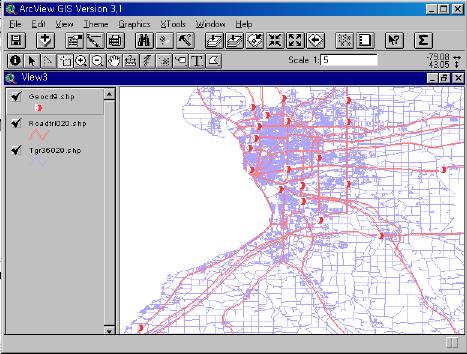
Adding X,Y Event
ArcView also allows you
to add a new theme to a view using a table containing events in your project as
the data source. For example, GPS reports the location as a latitude and
longitude. Police officers report the location of accidents using the milepoint
along with the route. Here we will demonstrate how to add the x, y event.
Unlike the Address geocoding, adding x, y event does not require any reference
theme because x, y event is defined on the coordinate system rather than other
themes.
Add a table containing
x, y coordinate in a Table.
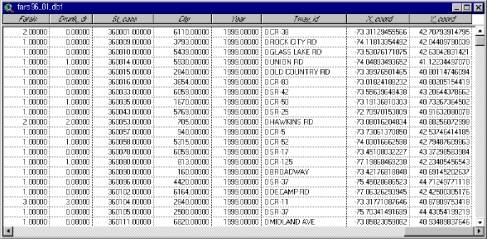
Choose the Add Event
Theme… from the View menu in a View. Select the appropriate table for Table
list, x, y coordinates for X field and Y field list. The x, y event will be
geocoded and added to the active view.
Since this theme is not
shapefile, you can save it as a separate file by choosing the Convert to
Shapefiles… from the Theme menu.