8.
Working with a Table
8.2 Joining/Linking Tables
8.2.1 Joining Tables
¨ Requirements for joining a table
¨ Possible relations between target and source table
Join an attribute table to a spatial boundary
8.2.2 Linking Tables
Link tables where the relation between target and source is
one-to-many
8. Working with a Table
8.2 Joining/Linking
Tables
You can join a table to the active table based on the
values of a common field found in both tables. Join establishes a one-to-one or
many-to-one relationship between the destination table (the active table) and the
source table (the table you are joining into the active table). Typically, the
source table contains descriptive attributes of features that you wish to join
into a theme's table so that you can symbolize, label, query and analyze the
features in the theme using the data from your source table.
¨ Requirements for joining a table
To join a table, you
first set a target(destination) and source table. (The source table will be
appended to the target table with joining.) The common field is used to join them
and is presumed to have the same value in the same field type. (The name of a
common field doesn’t have to be the same.)
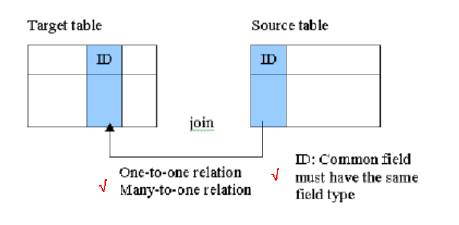
¨ Possible
relations between target and source table
One-to-one relation
Target table Source
table
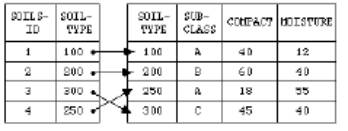
Many-to-one relation
Target table Source
table
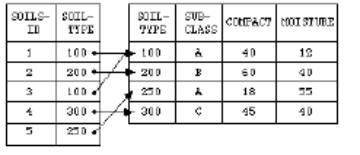
One-to-many relation
Target table Source
table
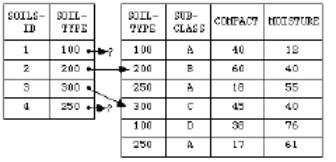
There are problems with
joining one-to-many relations between target and source; ArcView joins source
and target and the source will be appended to the target table. When the relation
between target and source is one-to-many, only the first matching row in the
source table will be appended to the target, and the rest is not joined.
Target data Source
data

Join
an attribute table to a spatial boundary
Add a theme containing
census tracts for Niagara County: use Add Theme button ![]() in a view; Open a theme table
in a view; Open a theme table ![]() ; this
theme table becomes a target table
; this
theme table becomes a target table
Add a table containing
demographic attributes: use Add button in a Project window; this table becomes
a source table
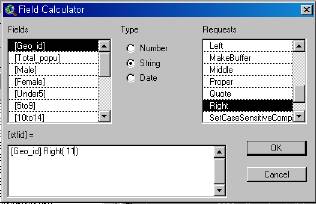
Check to see if they
have good candidates for the common field; a target table has a [Stfid], and a
source table has [Geo_id]. Actually they are not exactly the same. However, the
11 characters from the right in [Geo_id] is the same as [Stfid]. Add a new field
in a source table and calculate the new value into the new field. (To do this,
add a new field named [stfid]; make this field active; calculate
[Geo_id].Right(11) into the field. Save the edit).
Now we have the common
field that can be used to join two tables.
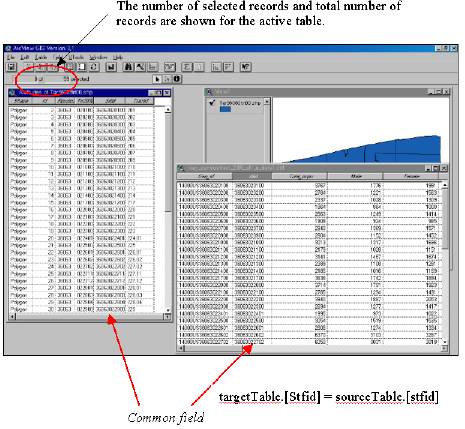
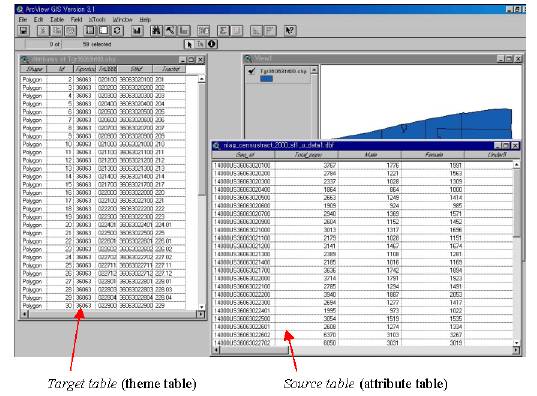
Check the relation
between the target and source table. Look at the number of records in both
tables. (The number of selected records and total number of records are shown
in the upper left of the toolbar area in a Table window.) Also look at the
values of the common fields by scrolling down in the table window. You can join
them unless the relation between a target and a source is one-to-many.
(Remember joining one-to-many relation will necessarily miss the information.)
They are one-to-one relation. Now we are ready to join them
Make the source table
active; Click the name of the common field you wish to use.
Make the target table
active; Click the name of the common field you wish to use.
Click the Join button ![]() . (This
button is enabled only when the common fields are active and two tables are
open; Please be careful to choose tables in order: choose a source table first
and a target table later; ArcView considers the currently active table as a
target (or destination) table and the latest one as a source table.)
. (This
button is enabled only when the common fields are active and two tables are
open; Please be careful to choose tables in order: choose a source table first
and a target table later; ArcView considers the currently active table as a
target (or destination) table and the latest one as a source table.)
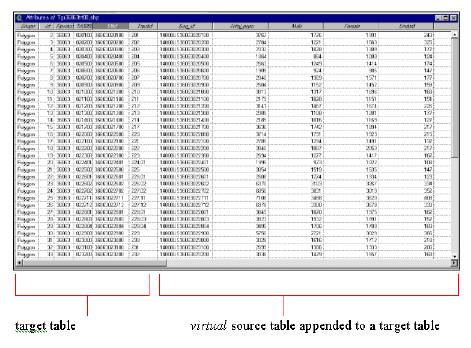
The source table is
appended to the target table as shown above. (The attributes appended are
virtual, which means it is not permanently saved and it allows you to join
tables dynamically. (For example, suppose you close this target table.
When you open this table later, the virtual source table appended will not be
in there.) If you want to remove the join (in case you choose the wrong common
field or want to join other attributes), simply choose the Remove All Joins from
the Table menu; If you want to save this target table, you can also save them
as either theme or table.)
Open the view.
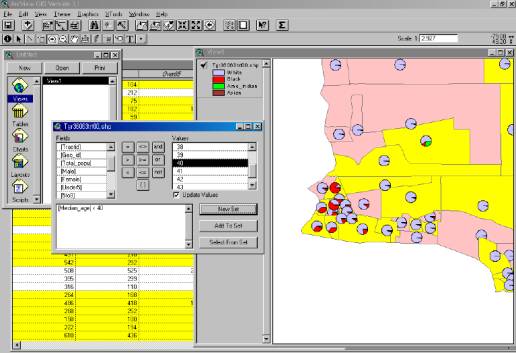
Now you can make
thematic maps using the attributes appended. Or you can also query features
based on the attributes since the attributes are dynamically linked to map
features.
Make a dot density map
using the attributes appended, say total population.
Make a chart map showing
the race composition in each census tract.
Make a map showing the
proportion of age group over 85 if you are interested in health coverage issue
in this area.
Query features where
their median age is less than 40
We learned how to join
tables when the relation between target and source table is one-to-one or
many-to-one relation. Naturally the next question would be “what about
one-to-many relation?” Of course, ArcView lets you work with this kind of
relation as well.
You can link a table to
the active table based on the values of a common field found in both tables.
Link establishes a one-to-many relationship between the target table (the
active table) and the source table (the table you are linking to the active
table). One record in the destination table is related to one or more records
in the source table.
Link
tables where the relation between target and source is one-to-many.
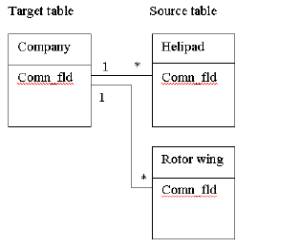
To illustrate the
one-to-many relation between the target and source table, suppose you are the
manager of air medical service. Each air medical service provider owns base
helipad as well as rotor wings. Typically one company owns multiple helipads.
We are interested in querying helipads a specific company maintains. We can
think of a service provider theme as a target table (actually theme table), and
helipad tables (or rotor wing tables) as a source table.
Make the source table
(e.g., helipad) active; Click the name of the common field you wish to use.
Make the target table
(e.g., company) active; Click the name of the common field you wish to use.
Click the Link from the
Table menu.
Unlike joining tables,
linking tables simply defines a relationship between two tables, rather than
appending the fields of the source table to those in the destination. When
tables are linked, neither table is changed - they are just linked to one
another. After a Link is performed, selecting a record in the destination table
will automatically select the record or records related to it in the source
table.
You can also work with
relations between more than two tables. The following shows the relation that a
company owns four helipads, and each helipad serve multiple counties.
New
file will be generated such as “.aih” and “.ain”. They contain the information
about the link we performed. Even though it is not save into the data, we can
retrieve the link by saving as the project file and opening the file later.
(same as join).